A lot has changed since my original post on Munki 1, with Munki 2 well and truly out I have taken the opportunity to write an updated guide on Munki 2.
What is Munki?
Munki is a community driven project created by Greg Neagle, allowing IT Administrators to efficiently deploy software to large numbers of Macs.
A Munki implementation can be broken down into two core parts;
a) repository hosted on a web server
b) bunch of clients running the Munki software
A Munki Repository
Since a Munki repository is simply a collection of organised files served out by a web server it can be hosted on any web server (e.g. IIS, Apache, etc.) regardless of platform. In the situation where the repository is hosted on a remote server, Administrators can remotely edit the repository over a network share.
Every Munki repository is comprised of the following four directories:
pkgs: All package (.pkg) and disk image (.dmg, .iso) files.
pkgsinfo: For each piece of software in the pkgs directory there is an associated file in pkgsinfo. These files contain detailed information about that piece of software and the catalog(s) that software is assigned to. Conventionally these pkgsinfo files have the .plist extension.
catalogs: Catalog files are generated from the contents of pkginfo files, they are used to separate production (tested) from development (untested) versions of software.
manifests: Clients are configured to download a particular manifest file. These manifest files contain a list of software to install and the catalog (version) to use.
Note: Apart from the contents of pkgs every other directory contains standard Extensible Markup Language (XML) files.
With the release of Munki 2, there are three additional directories:
artwork: A place to store any images used within software descriptions.
client_resources: Home to the Managed Software Center application theme files.
icons: Contains images (.png) used as software icons in the Managed Software Center application. The recommended icon resolution is 300x300.
Setting Up a Repository
The steps for setting up a Munki repository vary depending on web server and platform. For OS X the standard procedure involves creating a ‘munki_repo’ directory in ‘/Users/Shared/‘, populating it with the directories listed above. Then creating a symbolic link from ‘/Users/Shared/munki_repo’ to ‘/Library/Server/Web/Data/Sites/Default/’ and enabling the OS X Server web server.
Managing Munki Repositories
Download and install the latest release of Munki Tools here.
Part of Munki Tools are the Munki Admin Tools for command-line management of Munki repositories. Unless you enjoy working purely in the command-line, I recommend downloading Hannes Juutilainen’s MunkiAdmin, a user-friendly application for managing Munki repositories.
Install AutoPkg
AutoPkg automates the process of downloading and importing third party software updates straight into the Munki repository. Look at setting up AutoPkg by following my guide here.
Manually Importing New Software
If you wish to manually import a piece of software here are the steps:
Before we can use the Munki Admin Tools we need to complete the initial setup. To start the setup open Terminal and type:
munkiimport --configure
The 'Repo fileshare URL' can be left blank if the Munki repository is stored on the local disk, otherwise provide a network share path (e.g. smb://SERVERADDRESS/munki_repo).
I recommend following the guidelines below, to keep your Munki repository tidy:
First rename the software you wish to import:
- Match the name to the software (e.g. jre-7u67-macosx-x64.dmg > java.dmg).
- Only use lowercase letters (e.g. Firefox 32.0.3.dmg > firefox.dmg).
- Do not use dashes, underscores or spaces (e.g. Skype_6.19.0.452.dmg > skype.dmg).
- Delete version numbers (e.g. vlc-2.1.5.dmg > vlc.dmg).
- Omit the developer’s name (e.g. googlechrome.dmg > chrome.dmg).
Once renamed open Terminal and type ‘munkiimport ‘ (take note of the trailing space).
Drag the renamed package onto the Terminal window and hit return.
When prompted for an item name enter the name of the package without the extension (e.g. firefox.dmg > firefox).
The display name can contain spaces and capitals (e.g. Flash Player).
The description can be left blank for now, as it can be added in later with MunkiAdmin.
The version number is pulled from the software, verify it is accurate and hit return, otherwise type in the correct version number.
When prompted for a category, use the Mac App Store categories as a guide (e.g. Productivity, Utilities, etc).
Enter the developer’s name (e.g. Apple, Google, etc).
When prompted for Catalogs hit return.
You will be presented with a summary of your input, if you are happy that it is all correct type y and hit return.
Just hit return when asked for a subdirectory path.
Munki may offer to extract an icon, type y and hit return.
You are given a chance to make any alterations to the newly generated pkginfo file, simply press control + X.
Lastly you are asked if you would like to rebuild catalogs, type y and hit return.
Assigning Software to Manifests
To put it simply manifests contain lists of software to install and the catalogs (software version) to use. Software can either be set as mandatory (managed_installs) or optional (optional_installs). Optional installs provide a self-service experience similar to the Mac App Store.
MunkiAdmin makes the process of assigning software to manifests simple, just add a new item under either the Installs tab (mandatory) or the Optional Installs tab.
As seen in the diagram below, every Mac installs a SOE (Standard Operating Environment) suite of software. Depending on the Mac’s location (e.g. Art, Music, etc.) and the intended user type (e.g. staff or student), additional software (e.g. Photoshop, Sibelius, etc.) is installed. Since Munki clients can only check a single manifest, I have dealt with this limitation by stacking manifests.
It may seem confusing at first, but once the manifest infrastructure is in place, assigning new software to all relevant clients is simple. The green bubbles are manifests that clients check and we normally avoid adding any software directly to these. Yellow are purely for merging manifests, again nothing should be added to these. Blue are core attributes (e.g. laptop, staff, science, etc.) and software is assigned to these.
Configuring Munki Clients
Once Munki Tools is installed, clients need to be configured with the Munki repository's address and which manifest to check. Often these settings are configured using DeployStudio, a payload-free package or another means of script execution. This can be performed manually in Terminal with:
defaults write /Library/Preferences/ManagedInstalls.plist SoftwareRepoURL http://SERVERADDRESS/munki_repo
defaults write /Library/Preferences/ManagedInstalls.plist ClientIdentifier MANIFESTNAME
Testing Software
Before pushing out software to every Munki client it is important to thoroughly test that it works as expected. You should configure at least one test machine the same way as the rest of your client’s with the exception of pointing it to a testing manifest.
A testing manifest should include both the development and production catalogs, as well as a manifest directly accessed by clients.
Once that piece of software has been deemed stable, add it to the production catalog and watch as the rest of your clients install it.
Frequently Asked Questions
If you have read this far, you should be starting to get an understanding of how useful and feature rich Munki is. For readability I have chosen to tackle common queries I receive regarding Munki.
How does Munki know what is already installed?
Any applications installed by simply dragging and dropping them into Applications are detected by Munki. If a user deletes a drag and drop app from Applications Munki will notice its absence and reinstall it.
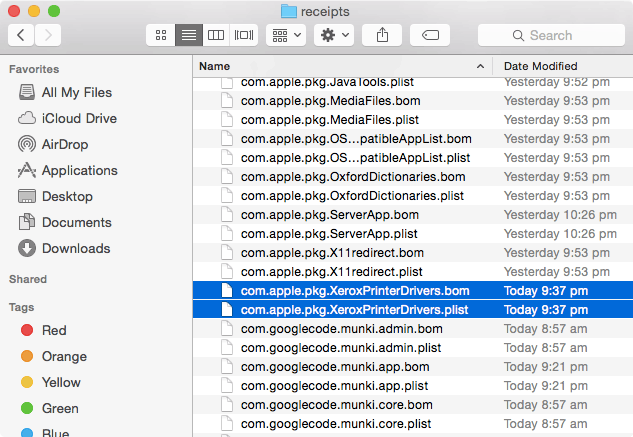
With package files, Munki indirectly checks for the existence of receipt files, therefore deleting the associated .plist and .bom files of a package in /var/db/receipts will cause Munki to reinstall that package.
Managed Software Center keeps attempting to install the same package over and over. What’s going wrong?
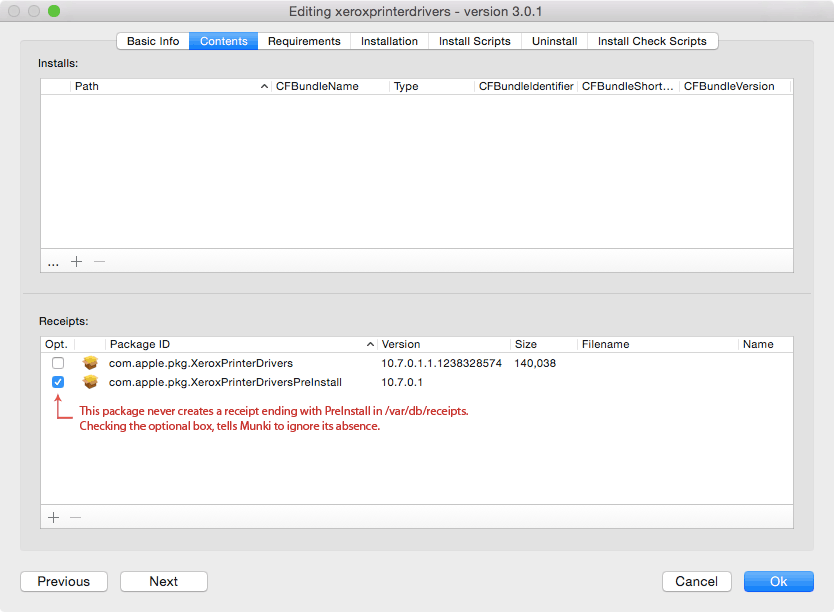
If MSC loops on a package, compare the receipts listed in the pkginfo file to the receipts present in the '/var/db/receipts/' directory. Once you figure out the missing receipt(s) mark them as optional (ignored).
You can also use Terminal’s ‘pkgutil’ command to search for installed receipts. In the example below I am searching for receipts containing the word xerox, the (?i) part ignores case and .* are wildcards.
Can we customise the banners in Managed Software Center?
Absolutely! You can even customise the sidebar and footer links. The official Munki wiki does a great job covering this in detail here.
How frequently does Munki check for updates?
After ten seconds of inactivity at the login window Munki will automatically install any locally cached updates.
By default a launch daemon is set to run ‘/usr/local/munki/supervisor’ ten minutes past every hour. The supervisor generates a random delay of up to sixty minutes to help stagger clients contacting the Munki repository. Once the delay is over supervisor triggers ‘/usr/local/munki/managedsoftwareupdate’, if there are new updates the logged in user is notified by Managed Software Center.
Note: Munki is also capable of installing software without any user intervention. This is achieved by enabling 'Unattended install' in MunkiAdmin.
Will Managed Software Center work outside of the organisation?
As long as the web server hosting the Munki repository is externally accessible MSC will also work externally. If you plan on hosting a Munki repository on a public web server you should also configure SSL Client Certificates to ensure access to the repository is limited to permitted clients.
How can I remotely trigger Munki clients to check for updates?
Using Apple Remote Desktop you can trigger groups of Macs to instantly check the Munki repository for updates and install.
Trigger Munki instantly regardless of whether a user is logged in:
/usr/local/munki/managedsoftwareupdate;/usr/local/munki/managedsoftwareupdate --installonly
Trigger Munki to run the moment the current user logs out or if nobody is currently logged in:
touch /Users/Shared/.com.googlecode.munki.checkandinstallatstartup
Tip: You can save those commands as Unix command templates in ARD.
How do I go about troubleshooting a Munki issue?
Since the Munki repository is just a bunch of files served out by a web server, almost all troubleshooting is performed from Munki clients.
On a client open Terminal and run:
sudo managedsoftwareupdate
This will immediately display any issues with the repository. You can also check the client log files stored in ‘/Library/Managed Installs/Logs/‘.
How do we update the version of Munki Tools running on clients?
AutoPkg makes it easy to keep your Munki clients up-to-date with frequently updated software (e.g. Flash Player, Java, etc.). You can quickly set up AutoPkg by following my guide here. There is a munkitools2.munki.recipe override included in my collection of recipe overrides. This will automatically import the latest release of Munki Tools into your Munki repository, as four separate packages:
munkitools_core.pkg: The required core command-line tools used by Munki.
munkitools_admin.pkg: The optional admin command-line tools for managing Munki repositories.
munkitools_app.pkg: The user-friendly Managed Software Center application.
munkitools_launchd.pkg: The launchd items to automate checking for updates.
The only package that should be assigned to a manifest is the munkitools_app, the rest are either marked as ‘required’ or ‘update for’ packages that would be installed regardless.


