How to Get Cheap iTunes Cards in Australia

1 Comment

How to Get Cheap iTunes Cards in Australia

If you spend anywhere near as much money as I do on Mac and iOS apps you’ll be looking to top up your iTunes balance frequently. A fantastic little Australian site I use for finding the latest discounts on gift cards is GiftCardsonSale.com.au (formerly iTunesonSale.com.au). Thanks to them I have saved 25% off my iTunes card purchases multiple times.

Next time you need to purchase some iTunes credit take a minute to check out Gift Cards on Sale, you’ll be glad you did.

1 Comment

A Guide to Installing & Uninstalling Mac Applications

Comment

A Guide to Installing & Uninstalling Mac Applications

People making the switch to Mac often ask, “How do I install programs and what’s the equivalent to ‘Add/Remove Programs’ on a Mac?” To answer this question I have put together a guide that covers the three main methods of installing and uninstalling applications in Apple’s Mac OS X:

MAS.png

Mac App Store: Apple introduced the MAS back in Mac OS X 10.6.6 (Snow Leopard) and it is now the preferred method for installing Apple approved applications. The Mac App Store notifies users when an app update is available and a new feature in OS X 10.9 (Mavericks) can even automatically install updates for you. Applications purchased through the MAS are linked to your Apple ID, allowing you to install purchased apps on multiple Macs for no additional charge. Another benefit is that you don’t need to keep track of any serial numbers.

Install: Simply click the price tag button and then click ‘Buy App’ to confirm the purchase. The app icon then literately jumps out of the MAS and into your Lauchpad.

Uninstall: Open Launchpad, click and hold your cursor on an app icon until you see the app icons shaking (I imagine that they are scared that you are going to delete them), then click the little cross in the top left corner of the app icon and confirm by clicking ‘Delete.’

Examples: iBooks Author, Flutter, Muse

DMG.png

Drag & Drop: These generally download as a .dmg (disk image) file, however I have also come across .zip and tar.gz (compressed archive) files, which all just contain a .app file. Apps are often distributed this way if they do not meet MAS requirements. You will find many community driven applications (open source) distributed this way as their licensing conflicts with Apple’s MAS Terms of Service.

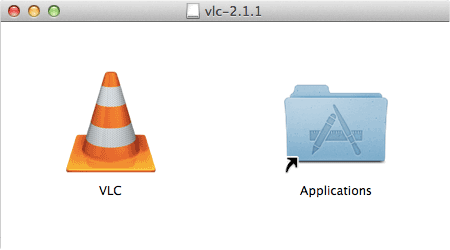
Install: Double click to mount the .dmg file and drag the app icon into your Applications directory to install. Often .dmg files will include an alias to your Applications directory, so you don’t need to fiddle with opening another Finder window.

DMG-Example.png

Uninstall: The easiest way to remove these apps is with FreeMacSoft’s AppCleanerOtherwise you can manually remove the app by going to Applications in Finder and dragging the app into the Trash.

Examples: Google Chrome, Mozilla Firefox, VLC

PKG.png

Installer Package: These are generally used if an application needs to install files outside of the Applications directory and/or needs to run an install script. An install of a .pkg or .mpkg file looks very similar to setup wizards found on the Windows operating systems.

Tip: If you ever want to extract something out of a .pkg file, you can use the free app ‘unpkg.’ It’s great for extracting the .app file in situations where an installer will refuse to run on your bleeding edge operating system.

Install: Double click the installer package file and click through the wizard.

PKG-Example.png

Tip: I recommend installing a free Finder QuickLook plug-in called ‘Suspicious Package,’ it presents detailed information about what an installer package is configured to do. Download Suspicious Package here, mount the .dmg and then click ‘Go’ → ‘Go to Folder’ then type ~/Library/.

Library.png

Create a new folder called ‘QuickLook’ and drag ‘Suspicious Package.qlgenerator’ into it.

Library-QuickLook.png

You will need to log out or restart your computer for Finder to detect the plug-in. Once installed, simply select a .pkg file and hit space to see detailed information about that package.

SusPkg-Example.png


Uninstall: By far the easiest way is to use AppCleaner. The next best thing is using a tool such as Suspicious Package to find where the package places files and manually go around and delete them. If you are feeling really geeky you could avoid using Suspicious Package and use the Terminal command ‘lsbom -lfs `pkgutil --bom /PATH/TO/PACKAGE/FILE.pkg`’ to get an idea of where the package places files.

Examples: Adobe Flash Player, Oracle Java, Microsoft Office


Unless you have used AppCleaner you’ll find settings/configuration files created by that application are left behind. If you want an application to behave like it’s never been opened before, you will need to trash any preference files containing to the application or developer's name. Open Finder and click ‘Go’ → ‘Go to Folder’ then type the following paths:

User specific settings: ~/Application Support/ and ~/Preferences/

System wide settings: /Library/Application Support/ and /Library/Preferences/

Comment

Turn Your Mac into a PHP Web Server In Under 10 Seconds

Comment

Turn Your Mac into a PHP Web Server In Under 10 Seconds

In almost no time at all this post will have your Mac up and running as an Apache 2 web server with PHP support. It's great for those that want to set-up a local web development environment to code that quick web app idea.


I have tested the following steps on Mac OS X Lion (10.7), OS X Mountain Lion (10.8) and OS X Mavericks (10.9).


Step 1: Enable PHP in the Apache configuration file

Open Terminal (/Applications/Utilities/Terminal) and type: 

sudo nano /etc/apache2/httpd.conf

Hit return and type your password. Don’t worry if it looks like you are not typing anything, it's just Terminal hiding your password input for added security.

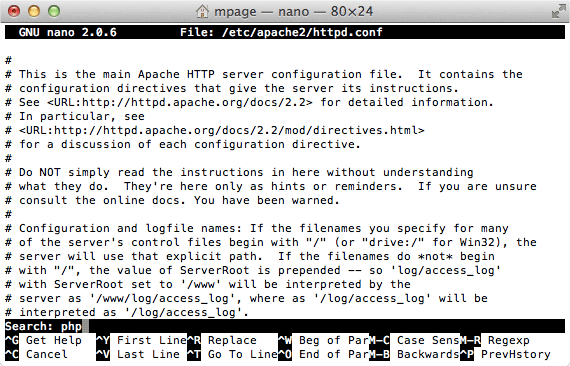
To search the document press control + w, type 'php' and hit return.

Seachphp.png

You'll need to uncomment (remove the leading #) the php5_module.

Uncommentphp.png


To save changes press control + x, type y and hit return.

Step 2: Start up Apache

Type: 

sudo apachectl restart

Step 3: Test it out

Open Safari and type 'localhost' into the address bar. You should see:

This is the default web page that comes with Apache.

This is the default web page that comes with Apache.

Open Finder and click 'Go' → 'Go to Folder…'

GoToFolder.png

Type “/Library/WebServer/Documents/“ and click 'Go.'

Tip: You can press ‘tab’ to autocomplete folder names.

Tip: You can press ‘tab’ to autocomplete folder names.

 /Library/WebServer/Documents/

 /Library/WebServer/Documents/

This index.html file is the “This works!” web page you saw in the last step. Go ahead and edit index.html in your favourite text editor. I like to use Coda 2 (bit pricey) for my web development projects, but you could use any text editor. Before Coda 2 I was using Smultron and Notepad++, which are much cheaper. Once you have made a change refresh the page in Safari to see your changes.


Comment

[SOLVED] "This copy of the Install OS X Mavericks application can't be verified. It may have been corrupted or tampered with during downloading."

62 Comments

[SOLVED] "This copy of the Install OS X Mavericks application can't be verified. It may have been corrupted or tampered with during downloading."

2018 UPDATE: This issue also occurs when attempting to install macOS High Sierra, with a slightly different error message: “This copy of the Install macOS High Sierra application is damaged, and can’t be used to install macOS.”

While trying to do a clean install of Mavericks onto a MacBook Air I received the error: "This copy of the install OS X Mavericks application can't be verified. It may have been corrupted or tampered with during downloading."

I found the error wasn't due to a corrupted Mavericks installer, but an incorrect date setting, caused by a flat battery. Since I had already blown away the previous Mac OS X install I needed to fix the time while booted from the Mavericks installer.

If you're experiencing this issue, here's what to do:

Boot into the Mavericks Installer. You can learn how to make bootable Mavericks USB here.

Open Terminal (Utilities → Terminal)

Check what the date is currently set to by typing "date". If it's incorrect type:

	date mmddHHMMYYYY
Substitute
mm = current month (e.g. February = 02)
dd = current date (e.g 31)
HH = current hour (e.g. 6pm = 18)
MM = current minute (e.g. 05)
YYYY = current year (e.g. 2013)

Hit return and quit Terminal. Now attempt the Mavericks install again, if it fails again it's not a date issue and I would try downloading and recreating your Mavericks installer.


62 Comments

Creating a Bootable OS X/macOS USB Installer

Comment

Creating a Bootable OS X/macOS USB Installer

Since the release of Mac OS X 10.6 (Snow Leopard) I've carried around a bootable USB on my keychain. It has made my life a lot easier reinstalling OS X/macOS without an Internet connection and troubleshooting Macs without a recovery partition. I also much prefer clean installs of the operating system, using this method vs updating from a previous version of OS X/macOS.

This post will go through the process I use to create a bootable OS X/macOS installer.


Requirements

  • At least an 8GB USB, you can also use a FireWire or Thunderbolt drive.

  • A Mac running 10.6.8 (Snow Leopard) or newer.

  • A fast Internet connection to download the OS X/macOS installer.


Step 1: Download OS X/macOS

If you haven’t already you can download the desired Install macOS application from the Mac App Store. Here are some direct links:

Once it's downloaded the installer automatically opens, simply quit it.

OSXMavericksInstaller.png
InstallOSXQuit.png

Step 2: Prepare the USB

We are about to erase everything on the USB, make sure you have copied off anything you wish to keep. 


Open Disk Utility (/Applications/Utilities/Disk Utility), select your USB drive from the list and click the ‘Erase’ tab.

Set format to: Mac OS Extended (Journaled)

Set name to either: Mavericks, Yosemite, El Capitan, Sierra, High Sierra, Mojave, Catalina, Big Sur, Monterey

DiskUtility.png


Click ‘Erase...’ and 'Erase' again, then enter your password if required. 

Step 3: Copy over the files

Open Terminal  (/Applications/Utilities/Terminal) and paste the appropriate command.

For Mavericks (10.9):

sudo /Applications/Install\ OS\ X\ Mavericks.app/Contents/Resources/createinstallmedia --volume /Volumes/Mavericks --applicationpath /Applications/Install\ OS\ X\ Mavericks.app --nointeraction

For Yosemite (10.10):

sudo /Applications/Install\ OS\ X\ Yosemite.app/Contents/Resources/createinstallmedia --volume /Volumes/Yosemite --applicationpath /Applications/Install\ OS\ X\ Yosemite.app --nointeraction

For El Capitan (10.11):

sudo /Applications/Install\ OS\ X\ El\ Capitan.app/Contents/Resources/createinstallmedia --volume /Volumes/El\ Capitan --applicationpath /Applications/Install\ OS\ X\ El\ Capitan.app --nointeraction

For Sierra (10.12):

sudo /Applications/Install\ macOS\ Sierra.app/Contents/Resources/createinstallmedia --volume /Volumes/Sierra --applicationpath /Applications/Install\ macOS\ Sierra.app --nointeraction

For High Sierra (10.13):

sudo /Applications/Install\ macOS\ High\ Sierra.app/Contents/Resources/createinstallmedia --volume /Volumes/High\ Sierra --applicationpath /Applications/Install\ macOS\ High\ Sierra.app --nointeraction

 For Mojave (10.14):

sudo /Applications/Install\ macOS\ Mojave.app/Contents/Resources/createinstallmedia --volume /Volumes/Mojave --applicationpath /Applications/Install\ macOS\ Mojave.app --nointeraction --downloadassets

For Catalina (10.15):

sudo /Applications/Install\ macOS\ Catalina.app/Contents/Resources/createinstallmedia --volume /Volumes/Catalina --nointeraction --downloadassets

For Big Sur (11):

sudo /Applications/Install\ macOS\ Big\ Sur.app/Contents/Resources/createinstallmedia --volume /Volumes/Big\ Sur --nointeraction --downloadassets

For Monterey (12):

sudo /Applications/Install\ macOS\ Monterey.app/Contents/Resources/createinstallmedia --volume /Volumes/Monterey --nointeraction --downloadassets

Hit return, type in your password, then hit return again. Don’t worry if it looks like you are not typing anything, it's just Terminal hiding your password input for added security. Depending on your USB, the copy process takes approximately 20 minutes to finish.


That's it! You should now have a bootable OS X USB installer. Go test it out by plugging it into a Mac that is turned off, pressing the power button and then holding down the 'option' key.

I’d like to thank tywebb13  for sharing the above Terminal command on the MacRumors forums.


If you need any help feel free to leave a comment. 

Comment